Alright,someone asked me how I make skin look smooth,so here are a few methods with Photoshop and Camera Raw,that means Photoshop Lightroom as well.
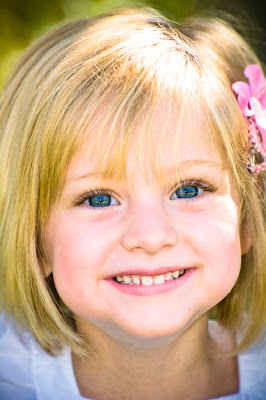
Below you can see an example I quickly created using the first method you will read about.I can't say I am pleased with the end result,it looks a little weird,but you have to agree it is a radical change:) (it is ok if you don't like it,I sad I ain't happy with it,I guess the eyes need more work first of all but I have the perfect excuse,It was a quick work).
Method no. 1
In Photoshop,we are going to use the Red channel to hide most skin imperfections,but first we are going to manually remove the bigger blemishes.
Create a new layer,above the opened image by going to the up most menus(File,Edit,Image...) and choose from the Layer menu New/Layer... Yes it has those 3 punctuation marks after the word layer.That means a dialog box will pop up.From here you can name your new layer,change its color to find it easier in the layers panel,change its blend mode and opacity,or if you check the clip radio button it will clip the new layer to its underlying one.Or you can use the shortcut Shift+Ctrl+N and the same Dialog will pop up.Or just use the new Layer button at the bottom of the Layer panel and no dialog will pop up,unless you hold down the Alt key while you click the button.

I renamed Layer 1 to Big Blemishes by double clicking the name"Layer 1"and typing the new name and hitting enter.We could work directly on the image,but this way,in case we mess up we can just delete this new layer and start again with the removal.Or you can use the Erase tool to erase parts where we messed up.But there always is the undo command as well:))Next select the Spot Healing Brush from the tools box.You can see where it is located in the image below.There are more tools nested there,so just in case you have a different tool selected from the nested ones right click or click and hold the tool active from the nested ones and choose the Spot healing brush from the fly-out.You can also use the shortcut "J"and shift+J to cycle through the tools nested there.Also make sure up in the tool options you check Sample all layers and content aware.Without the Sample all layers checked clicking on an empty layer will make no changes!

Using the Spot healing brush is very easy,you just click on a blemish and it is gone!But first make sure the hardness of the brush tip is set to zero.Right click on the image with the Spot healing brush and a dialog will pop up,you can set the hardness and the size of the brush tip from here.Size obviously depends on how big the blemish is.You can also use shortcuts. "["will make the brush smaller,and "]"will make the brush bigger.Shift+[ will decrease hardness and Shift+] will increase the hardness of the brush tip.Now you can begin clicking on blemishes.How ever don't use it on or near high contrast edges,like the edge of the face.I will cause some smearing.I will write an other post about how to deal with these kind of situations,but this is not the point right now and I don't want this post to get too long.You can also click and drag to brush over some areas like the cheeks to smoothen them out a little bit.So basically you can smooth out skin just by the use of the Spot healing brush or some other tool nested in that group.Here is how the image looks like after clicking on some blemishes.

Next lets see what is this smoothing with the Red channel all about.Select the Channels tab next to the Layers panel or go to window/channels(in the up most menu) if you don't see it.An image straight out of the digital camera will be in RGB mode.So when you open it in Photoshop it will be in RGB mode.That is what you see in the Channels panel.The 3 channels Red,Green and Blue that make up the image.If you click on the channels individually you will see a grayscale representation on how that particular channel looks like.That means the image will turn grayscale on screen.It is a visual representation on the amounts of Red,Green and Blue in an image.Light areas represent big amounts of that particular color in those pixels,dark areas mean those pixels don't contain that much of Red ,Green or Blue,depending on which channel you are viewing.So black means 0,White means an amount of 255(in a 8 bit/channel image)so basically 100% Red,Green or Blue.

As we can see in the image,the skin contains lots of reds,that is why the red channel is so bright.But all the blemishes live in the green and blue channel.I made the Big Blemishes layer invisible to show the channels just so we can clearly see the differences.With that layer visible the big blemishes will all disappear from our channels.Now it is obvious why we want to use the Red channel.Tho,I just realized I made a to good of a job removing the blemishes with the Spot healing brush.For this method removing the biggest ones would have been enough.Well,stupid me!But anyway,lets move on,first click back to layers or go to Window/Layers to click on the Background layer,that contains the image itself.We want to copy the Red channel info from the image not the blemish layer,that is why we need to select the background.Now go back to channels and click on the Red channel so now we can only see that particular channel.Ctrl+click the Red channels thumbnail to load its transparency.In channels black means transparency so now we select every pixel that does not have a value of 0,that means black and transparency also.So now that we have a selection active,hit ctrl+C to copy whatever falls into the selection.Click back on RGB,the up most layer in the channels panel,to bring back the color version of our image,go back to the Layers panel(window/Layers,if you don't see it)click back on the Big Blemishes layer and hit ctrl+V and it will create a new layer above our Big Blemish layer with the data from the Red channel.Now the image looks like this.I will double click the name layer 1 and re-name it to Red channel.Hit the enter key to commit that.


To see only the Red channel on a transparent background,for a better idea on what we copied out Alt+click on the Red channel layers little eyeball,that represents the layers visibility.Only clicking on the eyeball would make that particular layer invisible,Alt+clicking on it makes everything else but that layer invisible.This is how the layer looks like on a transparent background.
So! we have to agree on one fact! The image looks like crap now,with muted colors. Here is the part where I am still experimenting with this method to make it more efficient.The next step will raise some issues again.We will set this Red channel layers blend mode to luminosity.By definition this means it will create a result color by using the hue and saturation of the base color and the luminance of the blend color.In other words it will use the hue and saturation of the image and the lightness of the Red channel layer,which results in a bright image.as seen below.

Now the image looks like hell again.Well,first,the neck looks to weird to me,looks to dark and the colors don't look right to match up the overall look of our picture.We are going to fix that now.First we are going to draw a selection with the brush tool,to select just the neck area.First we need to enter quick mask mode.Until version CS3 there where to buttons at the bottom of the tool box,one was the Enter quick mask mode button and the other one the exit.Since then there is only one button now that does both operations.But you can just hit the "Q"button on the keyboard to enter and "Q"again to exit quick mask mode.Here is a screen shot of where the quick mask button is located.

Anyway,just press "q"on the keyboard,then select the brush tool,shortcut "B"There are more tools nested with the brush tool,so you may have to use the shortcut shift+B to cycle through the tools nested in case you used an other tool from there an it still is selected.Or you can click and hold or right click to get the fly out of the nested tools and select the brush tool.
Right click on the image and make hardness zero.Decrease the brush size at the edges for a more accurate selection(see the part with the Spot healing brush tool).Don't get scared because you are painting with red.It is a visual sign that we are in quick mask mode.Here is how my mask looks like.

Now hit "Q"again to exit the quick mask selection method.By default it selects everything but the neck,you can see that when you exit the mode and a selection appears.We need to invert that by holding down shift+ctrl+I,or by going to Select/Invert.By the way,while in quick mask mode,you can see that you are painting with black with the brush,if you check your foreground and background color,you will see you have black as foreground and white as background.So in case you Paint outside of the neck area you can use "X"on the keyboard to swap your foreground with the background color and you can paint away then the red color from undesired areas.Ok now we have a selection in place.Click on the Red channel layer,because we are going to create a curves adjustment layer,and we want that to land above all layers.Click on the half black half white circle,there is where the adjustment layers are located,and choose "curves".Or you can go to Layer/New adjustment layer/Curves.

And here is the curves adjustment panel that just pops up.Until version CS3 it will pop up in a different floating window.
First I will click on the upper part of the Diagonal line and drag it to the left.There are the lighter pixels located and draging them to the left will make them even brighter.I also placed a node on the lower part to make some of the midtones a little darker,but overall we brightened the neck area.
Now we are going to color correct the neck area.In the Curves panel you can see there a drop down,where it says currently RGB.Click on the down pointing arrow and choose Red.Obviously the neck area needs more red.
You can see that I just placed a node in the middle of the diagonal line and dragged it slightly to the left to add more red to our selected area.Next I want to knock out some yellow.We do that by adding more blue.In a nutshell,each color has its opposite,that means they knock each other out.Red with cyan,Green with magenta and blue with yellow.So what we just did we added more red,it knocked out some cyan and made the pixels more red.Now we want to knock out some yellow,so we are going to add more blue just enough to knock out the yellow without starting to add a bluish tint.And basically this is how color corrections work.

Now that I am finished with the correction it is sort of obvious i should go back and decrease the amount of red,it looks to reddish to me now,but I am to lazy to do that right now.So it is obvious you will have to go back and readjust a lot of times.Just switch from Red to Green or Blue as needed and play with the adjustments until you are satisfied.I will double click on the adjustments tab to collapse that.I have my adjustments panel under my layers panel.A personal preference of mine,you can set up your workspace how ever you will comfortable with it.I will create an other curves adjustment for an overall color correction,because I don't like how the image looks right now.We don't need a selection,just create another curves adjustment the same way we just did before.


I obviously did no great job but I don't have to much time to waste to finish this post quickly.I realised it would be easier to color correct the hair and the rest of the image separately,by drawing selections.The more you work on an image the better it will look!That's it for this method.I'm still trying to make it more efficient.It may work as a charm on slightly dark images because you will want to brighten it anyway,but sometimes it is to much work.However I find it a great method for demonstration purposes:)
Method no.2
OK! Gaussian blur vs Surface blur.The gaussian blur method was the first one I learned back when I was a beginner,so I still use it even today,tho the surface blur method should be more efficient.But first we are going to convert the image to a smart object.I deleted everything else but the Big blemish layer.I will paste that inside the smart object to save time.That means as a first step we are going to do the same thing and heal out the bigger blemishes.But First things first,right click on the background layer,that means our opened image and choose convert to smart object.We can use these method since version CS3.We did have a smart object version in CS2 but we could not use smart filters on a smart layer.This is what we are going to do.It is the most efficient and flexible method.

You can see above how your layer looks like after converted to a smart object.You can see in the lower right corner of the layer thumbnail that small symbol,that just means your layer is now a smart object.Next step is to double click the layers thumbnail,highlighted with red,and the image will open in a new document.Now we are in the smart object.Create a new layer,name it blemishes if you want to and follow the steps shown before to get rid of the bigger blemishes.Here is how the smart object looks like.

It is time to close the smart object(this new document).Hit ctrl+w and it will ask you if you want to save the changes.Always hit "YES".Now we are back to the original document,but the big blemishes are gone.And we only have one layer in the layers panel.If you would double click its thumbnail again in will reopen the smart object.You will find there the Blemish layer,just in case you want to re-edit it.That is why smart objects are so much fun.We can group more layers inside of it and then edit it as one.Now we are going to add the Gaussian blur and the Surface blur filters to the smart object and it will affect all layers inside of the smart object.I am going to add both filters to this smart object.Go to Filter/Blur/Gaussian blur.

As we can see,we only have one slider to play with.We can adjust the amount of blurring applied,and it will blur everything.Go with a lower amount while watching the skin.We only want to soften the appearance of the skin a little bit.After that hit ok.Here is how the smart object looks like now.
We are going to work with the smart filter mask a little bit later.Double clicking the Word Gaussian blur will reopen the dialog box and you can change the range setting if you are not happy with it.Double clicking the Additional settings symbol will open up a box where you can set the opacity of the effect or change its blend mode.For now click on the eyeball before the word gaussian blur to make the effect invisible.Now go to Filter/Blur/Surface blur.

Here we have 2 sliders to play with.Surface blur should leave high contrast edges alone while blurring the rest of the image.So the threshold slider defines the edge detection sensitivity.While Range the blurring amount.You can see it does a great job at most of the edges,but it blurs the hair even at a low threshold setting because there is not enough contrast between the hair and the face.Once you hit ok we now have 2 adjustments on the same smart object.The Gaussian blur is now invisible because we clicked on its eyeball.Now it is time to use the smart filter mask.Click on it.it is white that means all filters are visible on the whole image.Hit ctrl+I to invert the colors.That will invert the mask making it black,and all filters will disappear from the image,because the mask makes them invisible.Now with the brush tool "b" and white as our foreground color.once on a mask you can only use black,white and shades of grey,so your background and foreground colors will turn to black and white.Hit "x"if you need to,to get white as the foreground color,and with a soft brush start painting on the face.

Here is how the filter looks like only applied to the face. I also switched the brush opacity to a lower setting for areas like the neck.You can see the brush opacity setting slider in the area highlighted with red.Below you can see just the mask of the smart filters.Where I painted white the filters are visible.
Now you can switch both filters on and off to see witch one you like more.But there is one more filter we can add,to bring back a little texture in the skin,in case you don't want that perfectly smooth look on it.Go to Filter/Noise/Add noise.
I went with an amount of 2.It should also be Uniform,and check the monochromatic box.It will be only visible on the skin because all smart filters share the same mask.I would apply the same treatment with the quick masking for the neck because I don't like how that looks,plus other tonal and color corrections,plus some sharpening.In fact it is always better to start with the overall look first,then working on the detail.But the purpose of this post in skin smoothing.
Method no3.
So,the method with Camera Raw or Photoshop Lightroom.So if you have Photoshop,you have bridge that means you also have Camera Raw.That is why I am showing it in Camera Raw.Then a quick walk trough in Lightroom.Open up Adobe Bridge and locate your image on the hard drive.Click on it to highlight it,then hit the button circled with red to open up the image in Camera Raw.(for more explanations on how to find bridge and how to browse to find images you can read the post "black and white images with Lightroom and Camera Raw"under the Lightroom and CR tab.


When your image opens up in CR,first thing we are going to do,once again,is to remove the bigger blemishes.You can hit"B"on the keyboard for the spot removal tool,or select it by clicking on it,it is the tool circled with red in the image above.With the tool selected make sure it is set to Heal(the other area highlighted with red) then click and drag around a blemish to create a red circle that will cover all of the blemish.If it goes next to it and not onto the blemish you can click inside of the circle and drag it into position.It will automatically create the green circle for you,that represents the area sampled for healing.If you are not happy with the result you can click inside of it and drag it to an other position.Then go around the skin and remove other bigger blemishes.I am not going to do that right now.
Now select the adjustment brush,shortcut "K".The settings on the right will change.Amongst others there is a Clarity slider there,highlighted with red in the image below.Set the amount to a negative amount.By definition,clarity sharpens or decreases the mid tone contrast,with a negative amount it will introduce fuzziness. Make sure your brushes feather is set to 100% then paint over the skin.That green pin represent our adjustment brush.If you have more adjustment brushes that you used on the image you will have more pins.So depending on which adjustment you want to re-edit you need to click on that pin.So after you painted over the skin you can still revisit the clarity slider and adjust its settings.
Now lets see it in Lightroom.More info on how to open images in Lightroom you can find in the "black and white images with Lightroom and CR"post under the Lightroom and CR tab.
So once you have imported your image,make sure it is the only one with a check mark then hit develop,in the upper right corner,after library.And there are the two tools marked with red.The first one is the spot removal tool,shortcut "q"this time,and the other one is the adjustment brush,shortcut "K".everything works just as in Camera Raw.